Introduction to Git
Competence group (Faggruppe) Python
Simeon Simeonov - TDE
Agenda
- What is Git? A brief history
- Working locally. Dealing with commits and branches
- Using remotes and GitLab
- Walkthrough. Demonstrating some common Git flows
What is Git?
Git is a distributed version control system that tracks changes in any set of computer files, usually used for coordinating work among programmers who are collaboratively developing source code during software development.
Distributed version control is a form of version control in which the complete codebase, including its full history, is mirrored on every developer's computer.
- Git development was started by Linus Torvalds on 3. April 2005
- Torvalds wanted a distributed system that he could use like BitKeeper, but none of the available free (as in freedom) systems met his needs
- The main objectives were: performance, very strong safeguards against corruption, either accidental or malicious, distributed workflow
- The name: git means "unpleasant person" in British English slang. "I'm an egotistical bastard, and I name all my projects after myself. First 'Linux', now 'git'.". The man page describes Git as "the stupid content tracker".
- Torvalds achieved his performance goals on 29 April 2005
- Torvalds turned over maintenance on 26 July 2005 to Junio Hamano, a major contributor to the project. Hamano was responsible for the 1.0 release on 21 December 2005
- Current (23. February 2024) stable version: 2.44.0
Configuring Git
We start be configuring Git for our needs
- git config - gets and sets repository options
- git config --global - gets and sets global options
Using WSL / devbox or Git for Windows (from Software Center):
              # - this is a comment and the remainder of this line will be ignored by the shell
              git config --global user.name "Simeon Simeonov"
              git config --global user.email "simeon.simeonov@statnett.no"
              git config --global init.defaultBranch master  # sets 'master' as the default branch name
              # git config --global init.defaultBranch main  # sets 'main' as the default branch name
Note: The recommended name for the default branch is 'main'
The Git repository
A Git repository is a virtual storage of your project. It allows you to save versions of your code, which you can access when needed.
- git init - creates an empty Git repository or reinitializes an existing. A new .git subdirectory is created in your current working directory. This will also create a new master branch.
- git add - add file contents to the index - a file or directory (folder) contents are selected to be tracked
              mkdir myproject  # creates a new folder named 'myproject'
              cd myproject  # sets 'myproject' as current working directory
              touch README.md pycode.py  # creates the empty files 'README.md' and 'pycode.py' in the new folder
              git init  # creates an empty Git repository inside 'myproject' - a .git folder is added
              git add README.md pycode.py  # selects 'README.md' and 'pycode.py' for tracking
Tracking content
- git status - shows the working tree status
Each file in your working directory can be in one of two states:
- tracked - the files Git knows and "cares" about - files that were in the last snapshot, as well as any newly staged files. They can be unmodified, modified, or staged.
- untracked - files that Git doesn't "care" about
Often, you'll have a class of files that you don't want Git to automatically add or even show you as being untracked. These are generally automatically generated files such as log files or files produced by your build system. In such cases, you can create a file listing patterns to match them named .gitignore. Here is an example .gitignore file:
              cat .gitignore
              *.pyc
              *~
Committing changes
A commit command captures a snapshot of the project's currently staged changes. Committed snapshots can be thought of as "safe" versions of a project. A snapshot can be seen as a "node" (with an unique id) related to the previous commit (unless initial commit)
- git commit - records changes to the repository
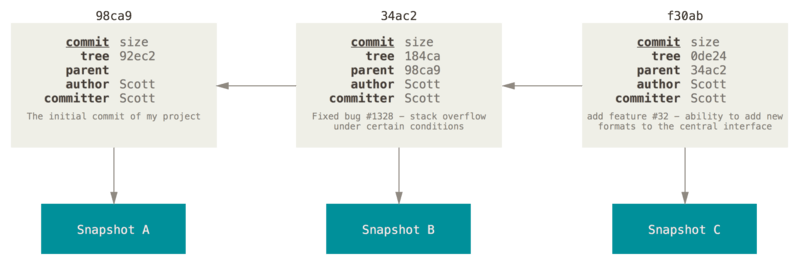
Any files you have created or modified that you haven't run git add on since you edited them - won't go into this commit. They will stay as modified files on your disk.
Committing changes (cont.)
- git diff - shows changes between commits, commit and working tree, etc
- git log - shows commit logs
- git show - shows various types of objects
- git tag - creates, lists, deletes or verifies a tag object
              cd myproject
              echo "# My project documentation" > README.md  # sets a basic content for the file README.md
              echo "import os" >> pycode.py  # appends a new content to the file pycode.py
              git add README.md pycode.py  # stages the changes
              git commit -m "Initial commit"  # creates a commit with commit message
              # git commit -a -m "Initial commit"  # automatically stages files that have been modified
              git log  # shows the existing commits (only one so far)
              echo "import sys" >> pycode.py  # appends a new line to 'pycode.py'
              git status  # shows that one file - 'pycode.py' has been modified since the last commit
              git diff  # shows that changes for this repository
              git diff pycode.py  # shows the changes for a particular file
              git commit -a -m "Import the sys module"  # stages and commits the last changes
              git tag v0.1  # creates a lightweight tag 'v0.1'
              git log  # shows that a new commit has been added
              git show <commit id>  # shows the files and their changes that are part of a given commit
Undoing things
- git restore - restores working tree files (Git version >= 2.23.0)
              cd myproject
              touch newpycode.py  # creates a new file
              git add newpycode.py  # sets the file as tracked (and stages it)
              echo "import sys" >> pycode.py  # appends yet another new line
              echo "The new project documentation is here" >> README.md  # appends yet another new line
              git add README.md  # stages README.md
              git status  # shows 'newpycode.py' (new file), 'pycode.py' (modified), 'README.md' (modified and staged)

              git restore --staged newpycode.py  # 'newpycode.py' now becomes untracked
              # git reset HEAD newpycode.py  # Git version < 2.23.0

              git restore --staged README.md  # unstages 'README.md' (modified)
              # git reset HEAD README.md  # Git version < 2.23.0

              git restore pycode.py  # reverts all modifications on 'pycode.py'
              # git checkout -- pycode.py  # Git version < 2.23.0
Git branching
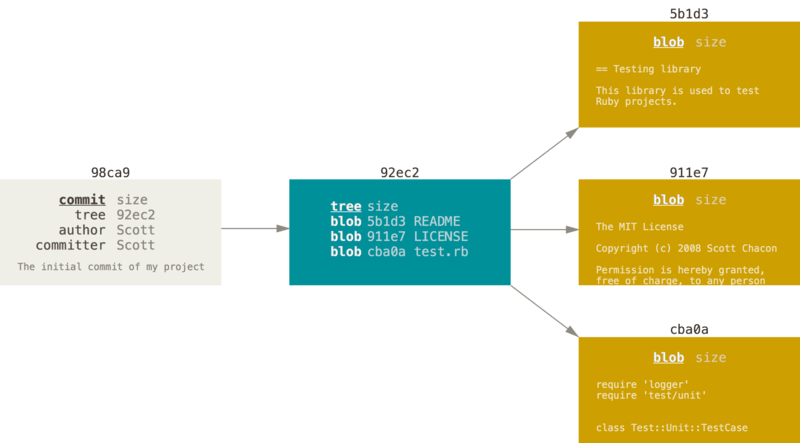
Branching means you diverge from the main line of development and continue to do work without messing with that main line. Some people refer to the Git branching model as its "killer feature", and it certainly sets Git apart in the VCS community. The way Git branches is incredibly lightweight, making branching operations nearly instantaneous, and switching back and forth between branches generally just as fast. Unlike many other VCSs, Git encourages workflows that branch and merge often, even multiple times in a day. Understanding and mastering this feature gives you a powerful and unique tool and can entirely change the way that you develop.
Git branching (cont.)
- git branch - lists, creates, or deletes branches
- git checkout - switches branches or restores working tree files
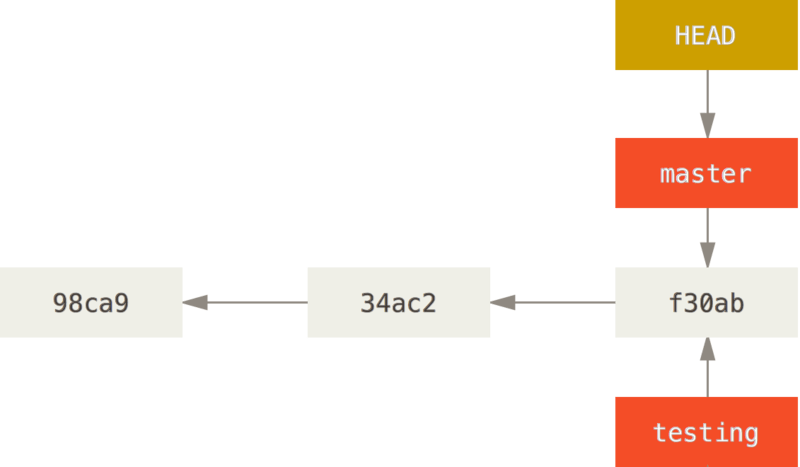
git branch testing # creates a new branch from 'master' called 'testing'
Git branching (cont.)
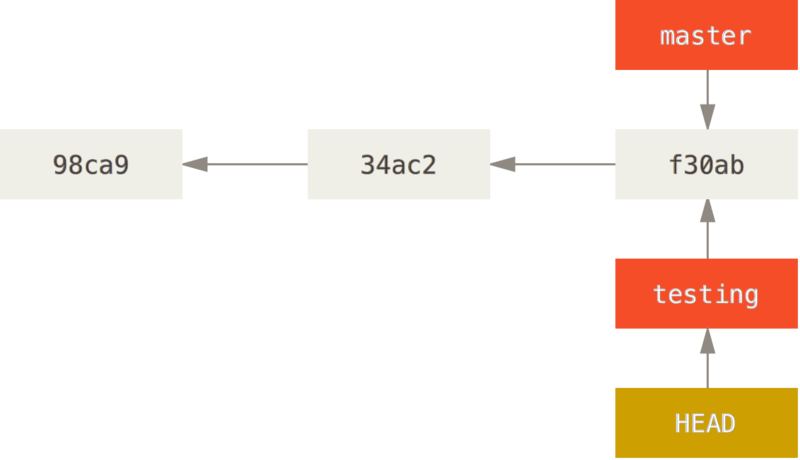
              git checkout testing  # makes 'testing' testing the current (active) branch
              # git checkout -b testing  # creates a new branch named 'testing' and makes it active
Git branching (cont.)
              echo "Extra content" >> README.md
              git commit -a -m "Improve the documentation"  # creates a new commit on the 'testing' branch
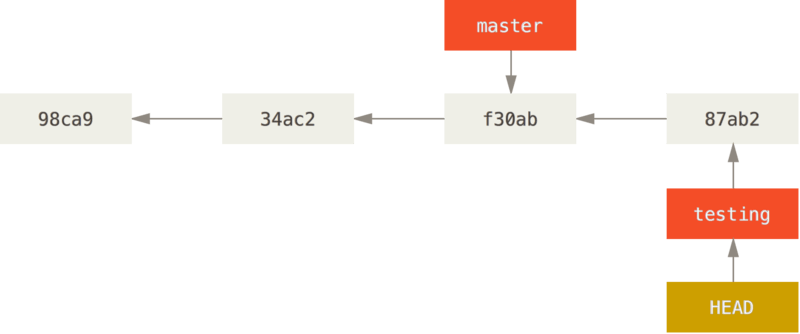
Git branching (cont.)
git checkout master # "switches" to 'master'
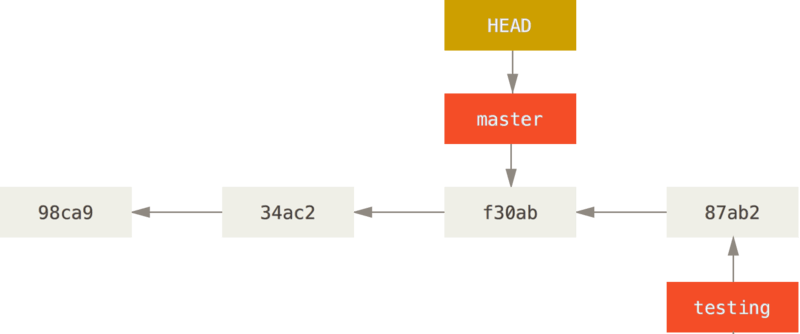
Git branching (cont.)
              echo "# Extra comment" >> pycode.py
              git commit -a -m "Add a very useful comment to the Python code"  # creates a new commit on the 'master' branch
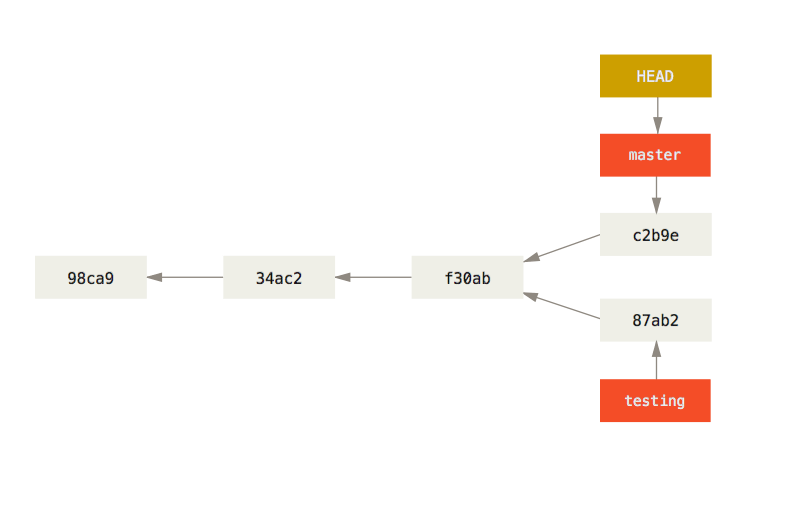
Merging
In Git, there are two main ways to integrate changes from one branch into another: the merge and the rebase
- git merge - joins two or more development histories together
There are three possible outcomes when attempting to merge two different branches:
- fast forward - the last common node between the source and the target branch is also the last node on the target branch (no changes since the source branch branched out). The changes (the commits) on the source branch are simply appended to the target branch. No new commits are created.
- merge commit - both the source and the target branch have new commits after the last common node. A new commit node is created on the target branch
- conflict - both the source and the target branch have new commits after the last common node. At least one file has been edited differently on both branches. A three-way-merge is performed resulting in a new commit node is created on the target branch
Rebasing
With the rebase command, you can take all the changes that were committed on one branch and replay them on a different branch.
- git rebase - reapply commits on top of another base tip
The following is a typical situation when dealing with two diverged branches. A new merge commit (C5) is created when using merge:
              git checkout master
              git merge experiment  # merges 'experiment' into 'master'
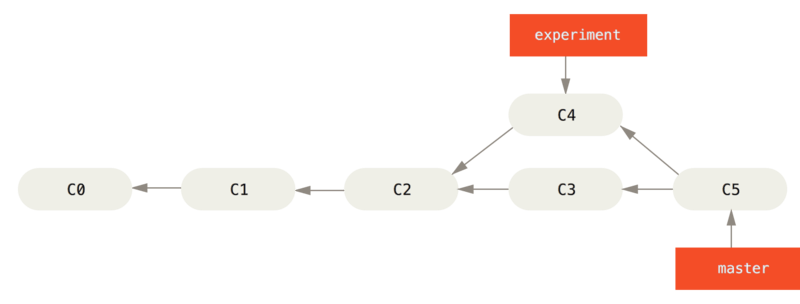
Rebasing (cont.)
              git checkout experiment  # Note!! (not master)
              git rebase master
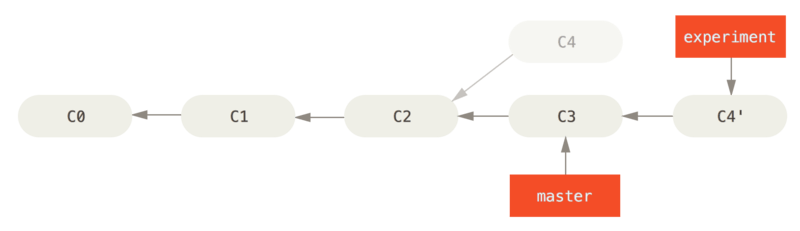
...now the following operation will result in a fast-forward merge:
              git checkout master
              git merge experiment
N.B. Do not rebase commits that exist outside your repository and that people may have based work on!
Remotes
To be able to collaborate on any Git project, you need to know how to manage your remote repositories. Remote repositories are versions of your project that are hosted on the Internet or network somewhere. Locally a remote can be seen as a sort of bookmark.
- git remote - manages set of tracked repositories (remotes)
- git clone - clones a repository into a new directory. A remote named "origin" will be automatically created
- git fetch - downloads objects and refs from another repository
- git pull - fetches from and integrates with another repository or a local branch
- git push - updates remote refs along with associated objects
The two most popular protocols (schema) for interacting with remotes are ssh and http(s) (usually read-only)
GitLab
GitLab is a developer platform that allows developers to create, store, manage and share their code. It uses Git, providing the distributed version control of Git plus access control, bug tracking, software feature requests, task management, continuous integration...
Statnett operates its own instance at https://gitlab.statnett.no. It is used for storing / managing Statnett's own Git repositories
Another popular and widely used platform is GitHub - https://github.com
Walkthrough
The following walkthrough illustrates some of the most common patterns when two or more parties are using Git and GitLab in a typical project at Statnett.
Note: GitLab's CI/CD will not be included in this presentation.
Note: This presentation should not be considered as a reference but merely as an introduction.
Walkthrough - Accessing GitLab
In order for a local repository to be able to interact with GitLab through the SSH protocol, a private / public SSH key pair has to be created
              ssh-keygen -t ed25519  # interactively creates a key pair in ~/.ssh
              cat ~/.ssh/id_ed25519.pub  # displays the public key
The public key is then added (pasted) under User settings -> SSH Keys -> Add new key
Walkthrough - Initial code / repository
When starting a new repository that is about to be shared using GitLab, a corresponding GitLab project is created first. Then there are two possible approaches.
- a new repository is created on GitLab and then cloned (git clone) by all other parties
- the repository is initialized locally and then pushed (git push) to GitLab
              git clone <url>  # clones (copies) the repository

              git remote add origin <url>  # adds a new remote in the local repository
              git push origin main
All parties should have a local copy of the same repository. For this demonstration we can imagine two users, randomly called "Daniel" and "Simeon".
Walkthrough - A very simple flow
Usually changes should not be committed directly into the main branch. Daniel starts by creating a new branch from "main" called "feature1"
He commits his changes there and pushes them to the remote (origin) branch "feature1". He then creates a merge request (MR) (also known as a pull request on GitHub) to the main branch on the remote origin
              git checkout main
              git checkout -b feature1
              # editing some code
              git commit -a -m "Add a new function"
              git push origin feature1
              # MR is created and reviewed by Simeon. "feature1" is then merged into "main"
              git checkout main
              git pull origin main  # done before the next time we want to branch out from "main"
Walkthrough - A more complex flow using rebase
Simeon starts by updating his local main branch. He then branches out from "main" to a branch called "interesting". He commits his changes there.
At the same time Daniel branches out to "moreinteresting" and commits changes (to a different file).Daniel pushes his changes to origin "moreinteresting" and then using MR to origin "main".
The next day Simeon rebases "main" onto his "interesting". Finally Simeon creates his own MR after pushing his "intersting" branch to origin interesting
              git checkout main  # both Simeon and Daniel
              git checkout -b interesting  # Simeon
              git checkout -b moreinteresting  # Daniel
              # editing some code
              git commit -a -m "Add a new interesting feature"  # Simeon
              git commit -a -m "Add a new even more interesting feature"  # Daniel
              git push origin moreinteresting  # Daniel

              # The next day (Simeon)
              git fetch origin  # the current branch is still "interesting"
              git rebase origin/main
              git push origin interesting
              # creates a MR
              git pull origin main  # done before the next time we want to branch out from "main"
Walkthrough - Squahing commits
The act of "squashing" your commits means that you combine multiple existing commits into a single one. If you should do this or avoid it is - to some extent - a question of preference: in some teams, for example, squashing commits is the preferred way to merge a feature branch back into a long-running branch like "master" or "main".
Squashing can be performed either locally (before MR) or on GitLab (before or after MR)
              # squashing locally

              # squashing only a selected amount of commits...
              # select the last 3 commits interactively,
              # ordering them with the last at the bottom of the interactive file
              git rebase -i HEAD~3
              # We then mark the line at the top (chronologically the first commit) with "pick"
              # and the rest of the lines with "squash" or "s".
              # Finally we are also adding a proper commit message.

              # Using "fixup" or "f" instead of "squash" will produce the same result,
              # except it will not prompt for a new commit message and will use the commit
              # message of the first commit.


              # squashing everything...
              git merge --squash <branch-name>
              # will take all the commits from the branch, squash them,
              # and stage all changes in the current branch
Sources
https://en.wikipedia.org - Wikipedia
https://git-scm.com/book/en/v2/ - Pro Git
The official man pages